Here is another frame DONE!!
Yay!!
This one is for the button monogram.
That frame was hiddeous! Skinny, boring, plain it did nothing for me!
See...
This needs MORE character, don't you think?
So, here's what I did....
Went to Lowes and bought an 8ft. piece of molding.
Kinda measured and cut. I'm not much of a perfectionist when it comes to measuring. I usually like to just eyeball it.
Sometimes it works and sometimes it doesn't.
I started with the miter box and hand saw.... That did not last long, wwwaaayyy to slow and it was killing my shoulder. I spied the power miter saw on Hubby's work bench. Hubby was actually taking a nap, so I couldn't ask him to do it for me. I thought, I can do this! He showed me how to use the miter saw....once...
Just go for it! And I did! :)
Did the miter corners come out good?
Well, they were good enough for me.
Later, when hubs was awake, he helped me glue the corners and the frame. Those clamps helped out a lot.
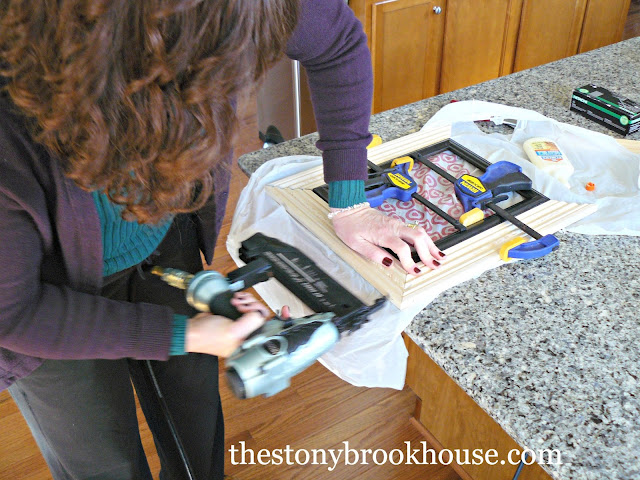
Once that was done, we got out the nail gun and nailed the corners for more stability.
There were a couple of ooops nails...
Hubby just got out his cutters and snipped the end off.
A little putty will fix that up!
Plus you can see that my corners did not meet up too well.
So, all the corners got filled in.
I also used some paintable caulk to seal around where the two frames meet. Can you see that gap?
All primed, ready to be painted.
After it was painted, I inserted the button monogram.
I liked it but it was kinda plain, it just needed a little "something".
Of course, I forgot to take a picture of that! Ugh!
Oh, well.
So, I decided to paint part of the molding black.
You can see the what a difference it made.
Much, much better!
This didn't come out perfect, but I like it that way.
Families aren't perfect either, so neither will my gallery wall.
This just makes me smile!
I would love to say that this was cheap... I don't think it was. The molding was about $12, I thought I could get 2 frames out of it. Nope!
And I didn't use any extra. Oh, well.
This next set of frames I'm working on was CHEAP!!
I hope they come out good!!
I'm half way through the project. I'm on a roll!
Blessings,
Lori
So, here's what I did....
Went to Lowes and bought an 8ft. piece of molding.
Kinda measured and cut. I'm not much of a perfectionist when it comes to measuring. I usually like to just eyeball it.
Sometimes it works and sometimes it doesn't.
I started with the miter box and hand saw.... That did not last long, wwwaaayyy to slow and it was killing my shoulder. I spied the power miter saw on Hubby's work bench. Hubby was actually taking a nap, so I couldn't ask him to do it for me. I thought, I can do this! He showed me how to use the miter saw....once...
Just go for it! And I did! :)
Did the miter corners come out good?
Well, they were good enough for me.
Later, when hubs was awake, he helped me glue the corners and the frame. Those clamps helped out a lot.
Once that was done, we got out the nail gun and nailed the corners for more stability.
There were a couple of ooops nails...
Hubby just got out his cutters and snipped the end off.
A little putty will fix that up!
Plus you can see that my corners did not meet up too well.
So, all the corners got filled in.
I also used some paintable caulk to seal around where the two frames meet. Can you see that gap?
All primed, ready to be painted.
After it was painted, I inserted the button monogram.
I liked it but it was kinda plain, it just needed a little "something".
Of course, I forgot to take a picture of that! Ugh!
Oh, well.
So, I decided to paint part of the molding black.
You can see the what a difference it made.
Now, that's a little better...
Much, much better!
This didn't come out perfect, but I like it that way.
Families aren't perfect either, so neither will my gallery wall.
This just makes me smile!
I would love to say that this was cheap... I don't think it was. The molding was about $12, I thought I could get 2 frames out of it. Nope!
And I didn't use any extra. Oh, well.
This next set of frames I'm working on was CHEAP!!
I hope they come out good!!
I'm half way through the project. I'm on a roll!
Blessings,
Lori


Good job Lori!!! I need one of those miter saws! Wood filler is definitely a friend. Love the new frame! xoxo
ReplyDeleteThis comment has been removed by the author.
DeleteHi Janis! Thank you sweet friend! You def need to check out one of those saws!!
DeleteI love what you did to dress up that frame! I just made my first few frames with a manual miter box.. and I like the idea of making a boring old frame into something really substantial! Very Nice;)
ReplyDeletejenny from diywithjenandb.blogspot.com
Hi Jenny! Thanks! You go, girl.... I didn't have the patience for the hand saw... :D
DeleteNice blog. I loved to read this review and i think it's seems like a great review i have ever seen. To the chagrin of every other manufacturer that has ever built a miter saw. Thanks for sharing this wonderful review Lori.
ReplyDeleteWhy thanks! I feel pretty confident with a miter saw now. :)
DeleteGreat Lori. Amazing job with a lovely girl. Is it a Ridgid miter saw?
ReplyDeleteThanks! It's just a regular miter saw, I think Skilsaw makes it.
Delete